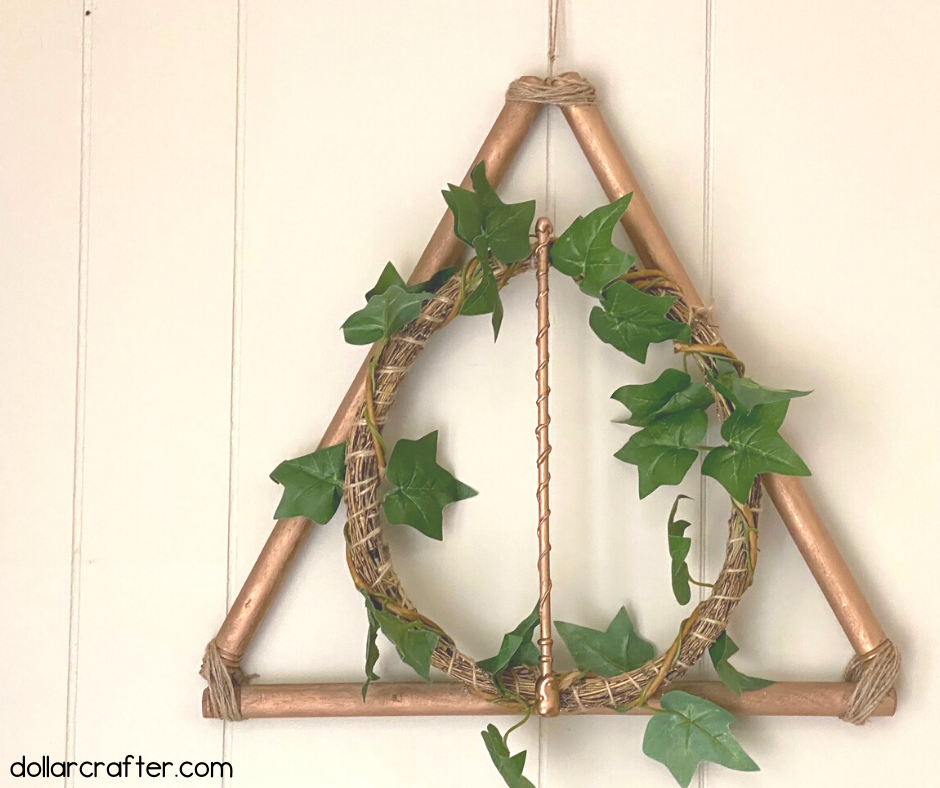
This Harry Potter Deathly Hallows Wreath is perfect for any fan of the series or anyone looking to give their home some magical flair. Hang this on your door to show off your love of all things Harry Potter!

Throughout Harry Potter, the Deathly Hallows play an important role in protecting Harry from Death while he worked towards defeating Lord Voldemort.
According to legend, the Deathly Hallows were three gifts that Death gave to three brothers. They are the Elder Wand, which is a powerful wand; the Resurrection Stone, which can summon spirits from the dead; and the Cloak of Invisibility, which makes you invisible.
This Harry Potter Deathly Hallows wreath is a copper-colored wooden triangle for the invisibility cloak, a bamboo circle with ivy for the resurrection stone, and an embellished harry potter magic wand.
This DIY project also only takes around 30 minutes – so it’s the perfect last minute Harry Potter craft!
Homemade Deathly Hallows Wreath
Supplies Needed:
- 3 Toilet Plungers (Dollar Tree)
- 12 Inch Bamboo Wreath
- 12 Inch Dowel
- Copper Spray Paint
- Hot Glue Gun and Glue
- Jute Twine
- Ivy Garland
- Scissors

Since it will take some time for the wand to dry, start your project by creating the wand.
To create a wand, start with the bottom. Swirl a lot of hot glue on top of the dowel. Make sure to add more at the bottom so that it has a handle shape. Once it is dried spray paint – we went with copper but you can make this wreath any color you want!

While the wand is drying, make the frame for the wreath. Twist off the rubber bottoms of each plunger and then spray paint them to match the wand.
While your items dry, wrap the ivy garland around the bamboo wreath. We chose ivy because we felt it added to the magical feel of the wreath, but you can use any floral/greenery element you would like or skip this all together.
Then once everything is dried simply hot glue all the elements together and add jute twine for decoration.

How to Make a Harry Potter Deathly Hallows Wreath
Ready to get crafting? You will find the full tutorial below!
Harry Potter Deathly Hallows Wreath

This Harry Potter Deathly Hallows Wreath is perfect for any fan of the series or anyone looking to give their home some magical flair. Hang this on your door to show off your love of all things Harry potter!
Materials
- 3 Toilet Plungers, Dollar Tree
- 12 Inch Bamboo Wreath, Dollar Tree
- 12 Inch Dowel, Dollar Tree
- Copper Spray Paint
- Glue sticks
- Jute Twine, Dollar Tree
- Ivy Garland, Dollar Tree
Tools
- Hot Glue Gun
- Scissors
Instructions
- Gather your supplies.
- Start by creating the wand. To do this you will use hot glue and a dowel. Starting from the bottom swirl the hot glue around the dowel until you reach the top. Make sure to add an excessive amount of hot glue to the bottom of the wand to create a handle shape.
- While the wand is drying, create the frame of the wreath. To do this remove the rubber bottoms from each of the plungers. They should just twist off.
- Spray paint the plunger handles copper and set aside to dry.
- Once the wand is dry, spray paint this copper also and set aside to dry.
- While your items dry, wrap the ivy garland around the bamboo wreath.
- Once the plunger handles are dry, hot glue the ends together in a triangle shape.
- Use jute twine to wrap each corner of the triangle. Add a loop of jute twine to the top of the triangle to hang your wreath from.
- Add the bamboo wreath to the center of the triangle and attach with hot glue.
- Lastly, attach the wand to the center of the bamboo wreath using hot glue.
- Once everything is dried, hang and enjoy your wreath!
Notes
For more simple wreath ideas visit DollarCrafter.com
More Harry Potter Crafts You Will Love
Please Save This to Pinterest
Your shares are how this site grows and I am sincerely grateful. Know a friend who’d like this? Please share it on Facebook or save it to your favorite crafting board on Pinterest.


I do love a Harry Potter themed craft. This is such a great way to make a wreath. I would not have thought to use the plunger rods at all! Pinned to make my own one day. Thanks so much for sharing the project. #HomeMattersParty