
This DIY beehive farmhouse décor project is perfect for sprucing up your home and making it more bee-utiful. It doesn’t take any expertise to make this fun rope beehive craft, and it’s all made from supplies at your local dollar tree. The best part is, the final product is only going to cost around $10!
This project is a great way to update your home and be able to add in some bee skep decorations for practically nothing.
We’re going to use items that are inexpensive, easy-to-find at the Dollar Tree, or even around your own house – basically anything you have on hand!
Rope Beehive Craft
Supplies Needed:
- Medium Sized Plastic Flower Pots (Dollar Tree)
- Nautical Jute Twine (Dollar Tree)
- Black Chalk Paint
- Hot Glue Gun and Glue
- Paint Brush
- Scissors
- optional: Bee Stickers
This process can work best if you have two different sized pots – but feel free to use more than two depending on what look you’re going for 🙂

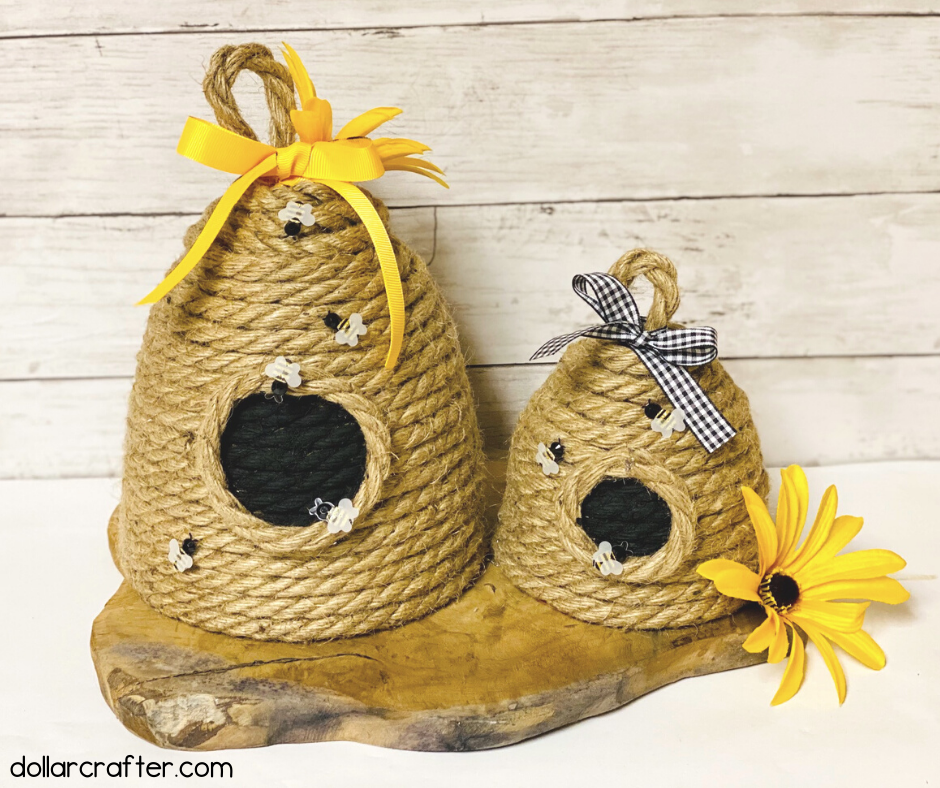
The first thing you’ll need is a plastic pot from your local dollar tree store. Choose one that has the shape and sizes of the beehives that you want. For ours, we chose two different sizes to give a layered look.
You’ll also want ones with nice, clean edges (no decorated lips) so it looks tidier when finished! All of these flower pots were $1 each!
Next, take some jute twine about eight feet long and wrap it tightly around the bottom of the flower pot twice using hot glue to secure until you reach the end of the rope. Once you’ve reached the end of your first rope, repeat with another rope from where you left off.
For our beehives, we only needed about one and a half of the ropes for the smaller pot so it was twelve feet in length, and three of the ropes for the larger one so it was twenty-four feet in length.
When wrapping your pots make sure there are not any visible gaps between the ropes.
Once you reach the top leave a gap to create your hoop. To do this cut a small amount of jute rope to create the hoop at the top, secure it with hot glue, and then cover the gap by wrapping the rope the remaining way up.
Cut the last of the rope off and let dry for a few minutes before continuing on!
Once dried, use scrap rope to create the hive hole add decorations, and place it on display!

How to Make a Miniature Beehive
Ready to get crafting? You will find the full tutorial below!
Beehive Farmhouse Décor Craft

This DIY beehive farmhouse décor project is perfect for sprucing up your home and making it more bee-utiful.
Materials
- Medium Size Plastic Flower Pot, Dollar Tree
- Small Flower Pot, Dollar Tree
- 5 (8 ft) Dollar Tree Nautical Jute Rope, Dollar Tree
- Hot Glue Sticks
- Waverly Ink Chalk Paint or Black Acrylic Paint
- Bee Stickers
Tools
- Paint Brush
- Scissors
- Hot Glue Gun
Instructions
- Start by applying a thin line of hot glue along the bottom edge of the flower pot. Apply the nautical rope. Keep adding glue and then the rope on top. Keep wrapping around the pot and gluing until you reach the end of the rope.
- Next add the next piece of rope. The small pot will use about 1.5 ropes, the large one will use 3 and a small section of the remaining section from the smaller pot.
- Wrap all the way until you get close to the top. For the small pot cut about a 4 inch section of the rope to make the loop for the top and for the large pot cut a 6-7 inch section of the rope.
- Add a good amount of glue (about the size of a quarter) to
the top of the flower pot and then place the ends of the rope on top of the pot and apply pressure. This will form the top loop. - Keep wrapping the rope around the pot. When you reach the top, apply the glue to the top of the rope and trim the end and place inside the rope section.
- Next for the small pot cut a 4-5 inch section to make the bee hive hole, and a 6-7 inch section for the large pot.
- I added glue to the ends first and applied pressure so they would stick together and then applied glue to the backside of the rope and the added it to the hive with some pressure so it would stay.
- Once you have completed this for both pots, use your Waverly Ink Chalk Paint and a paint brush to paint the inside of the circle. I applied 2 coats to make sure that it covered everywhere, especially in between the ropes.
Notes
For more fun DIY Crafts visit DollarCrafter.com
Please Save This to Pinterest
Your shares are how this site grows and I am sincerely grateful. Know a friend who’d like this? Please share it on Facebook or save it to your favorite crafts board on Pinterest.
Thank you so much for this idea! It’s really helpful and really easy to make! Highly recommended! Well done!