
I love simple crafts like this DIY Tiered Tray. All of the materials used in this tutorial can be found at your local Dollar Tree store or on their website.
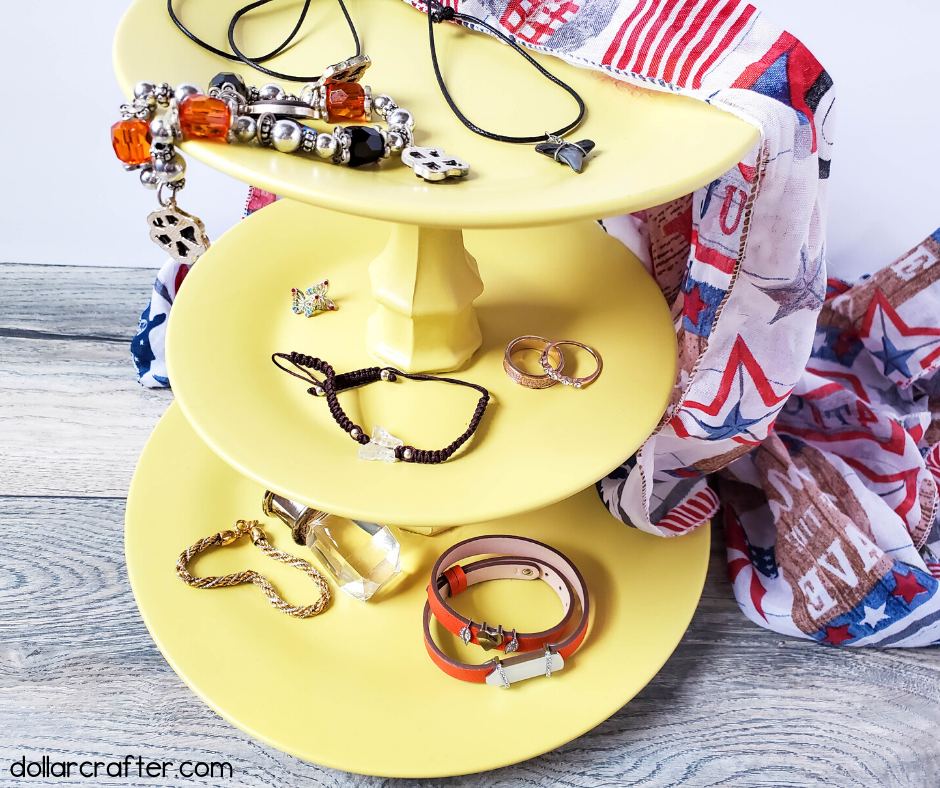
You can make something beautiful, without spending a lot of money. Win-Win!
The other day we made a fun wooden tiered tray from one of my favorite childhood games. After putting it to use in my house I just had to make another tiered tray for my dresser. They are the perfect catch-all!
Homemade Dollar Tree Tiered Tray
Supplies Needed:
You can find all of these supplies at Dollar Tree
- 1 Large Size White Plate
- 2 Medium Sized White Plates
- 2 Clear Candlesticks
- Gorilla Glue
- Light Yellow Spray Paint
Optional: If you plan on using your tray for heavy use I would suggest E6000 Glue or an outdoor glue.

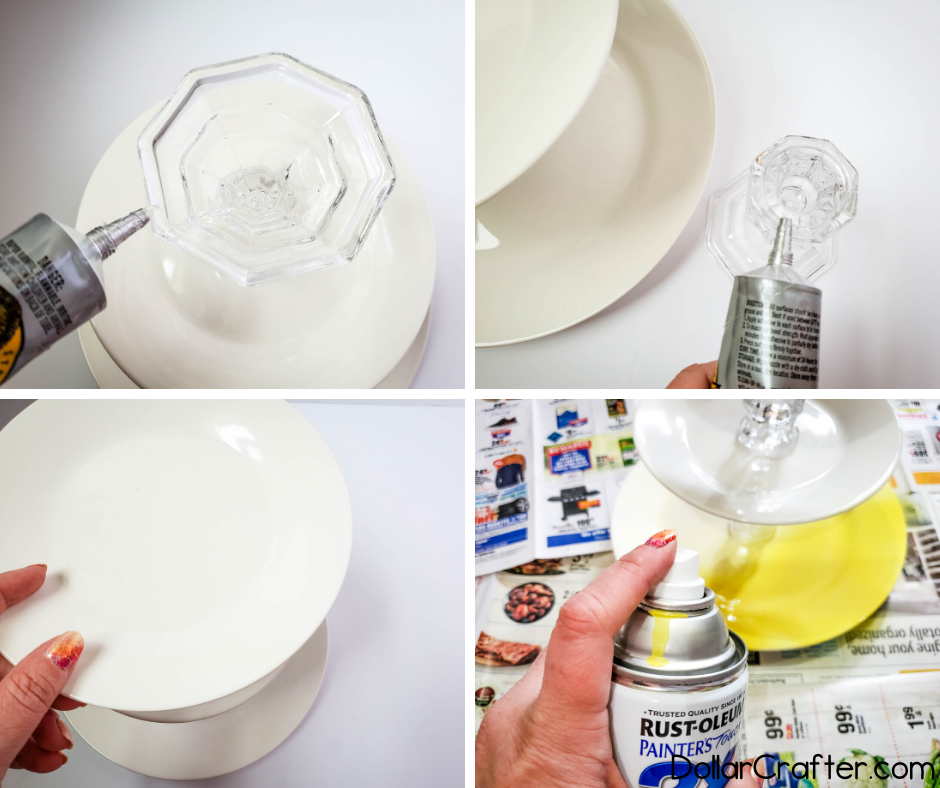
Making this craft is pretty straightforward. The only thing that is slightly tricky is that it can be a bit repetitive and on this tiered tray we will be applying the candlesticks upside down – so make sure that as you are going you are paying attention.
Having to take one-off after the super glue has set to flip it back around would pretty much suck 😉
Another thing to put thought into before you start is what type of spray paint to use. You will want to make sure that the spray paint you choose is durable enough for your intended use and if you are hoping to use this tiered tray for food, that the paint is food safe. This is the spray paint I recommend.
How to Make a Simple Tiered Tray
Ready to get crafting? You will find the full tutorial below!
Dollar Tree Tiered Tray

This inexpensive DIY tiered tray is great centerpiece you can easily make at home.
Materials
- 1 dinner size white plate
- 2 side size white plates
- 2 clear candlesticks
- Gorilla glue
- Light yellow spray paint
Instructions
Candlesticks will be upside down in this project. Please note that while assembling.
- Set the large plate onto a flat surface.
- Apply glue around the rim of the top of one candlestick and adhere it to the middle of the large dinner plate. Let set for a few minutes to dry a bit.
- Apply glue around the rim of the other end of the candlestick, and place one of the smaller plate centered on it. Let set for a few minutes to dry a bit.
- Apply glue around the rim of the top of one candlestick and adhere it to the middle of the smaller plate. Let set for a few minutes to dry a bit.
- Apply glue around the rim of the other end of the candlestick, and place the other smaller plate centered on it. Let set for a few minutes to dry a bit.
- Let the glue fully dry and work it’s magic overnight.
- Lay some newspaper or something down to protect your work space, and set the tiered jewelry tray on top of it.
- Shake the spray paint well, and spray your project.
- Allow the paint to dry, then flip over to paint the bottom.
- If desired, you may add an extra coat of paint.
Notes
For more simple DIY crafts visit DollarCrafter.com
Please Save This to Pinterest
Your shares are how this site grows and I am sincerely grateful. Know a friend who’d like this? Please share it on Facebook or save it to your favorite crafts board on Pinterest.