
This rustic Be Merry wood slice Christmas ornament is addictive to make and beautiful to display. Perfect for farmhouse decor, this ornament will be the star of your Christmas Tree! Use these ornaments as gifts, too–they make fabulous stocking stuffers.

DIY Be Merry Wood Slice Christmas Ornament
Wood slice ornaments are all the rage, and making this style of Christmas ornament at home is super easy and affordable. You can easily make this Be Merry Christmas ornament for under $5!
Supplies:
- 3.25″ to 4″ Natural Wood Slice
- Permanent black vinyl
- Clear varnish
- Standard grip transfer tape
- Twine or string
- Water
- Cloth
- Cutting mat
- Weeding tool
- Cricut machine
- Scraper tool
- Paint brush
- Drill
Find all our DIY Christmas Crafts and Ornaments here!
Tips for Applying Vinyl to Wood Slices
- Applying vinyl to wood is super simple; cut, peel, and press. However, we have some simple tricks that should be done when crafting your wood slice ornament to make sure it will last for years to come.
- Vinyl sticks decently to untreated wood, but to make sure it sticks and doesn’t peel, one of the first things you will want to do is bake your untreated wood in the oven at 220 degrees for an hour. This step has probably already been done if you purchase your wood slice from a crafting or online store.
- You will also want to sand down the wood to make sure it is nice and smooth and clean it with a damp cloth. Even if your wood does not need to be sanded, make sure you give it a good wipe down.
- When choosing a vinyl to work with, we highly recommend using permanent vinyl for wood projects. Heat transfer vinyl will also work (and give more of a painted look); however, you can run into issues with the HTV sliding under the iron that isn’t worth the effort with wood projects.
- Treating your wood will also help preserve the ornament. You can do this by painting the wood before you apply your vinyl or sealing the wood with a varnish after you have applied the vinyl (it honestly is a good idea to seal with varnish even if you paint to be on the safe side).
How to Make the Be Merry Wood Slice Christmas Ornament
Let’s get crafting! Below is our written tutorial.
Be Merry Wooden Christmas Ornament
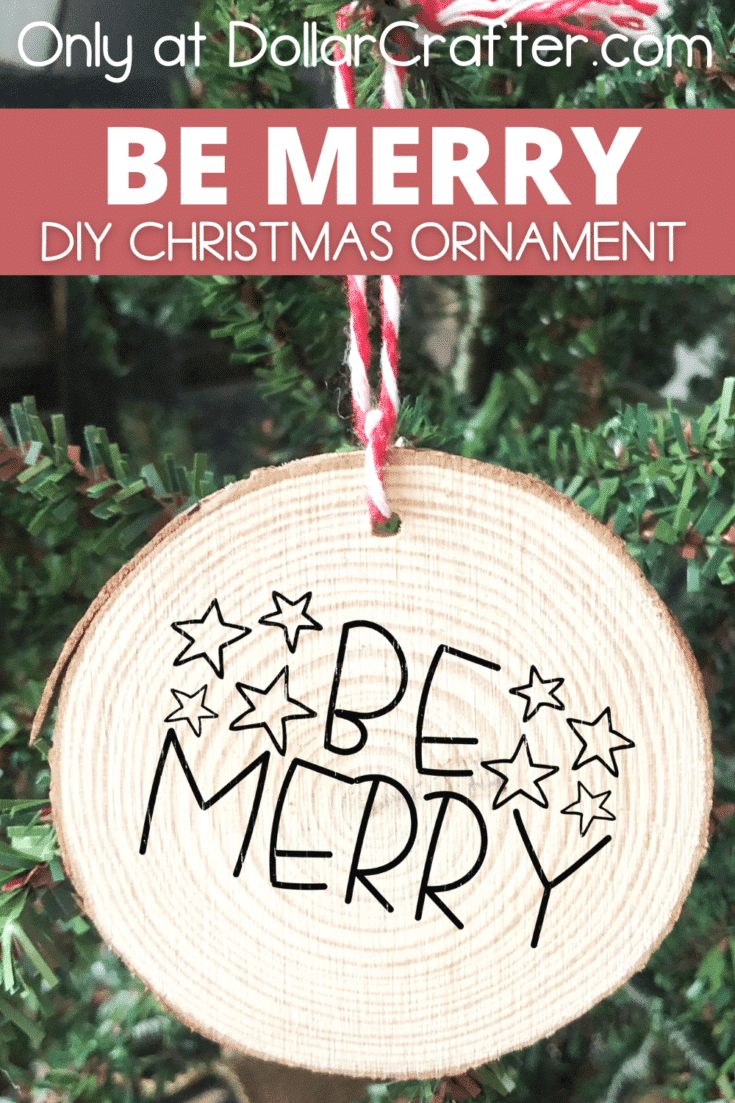
This rustic Be Merry wood slice DIY Christmas ornament is addictive to make and beautiful to display. Perfect for a farmhouse decor Christmas tree!
Materials
- 3.25" to 4" Natural Wood Slice
- Permanent black vinyl
- Clear varnish
- Standard grip transfer tape
- Twine or string
- Water
- Cloth
Tools
- Cutting mat
- Weeding tool
- Cricut machine
- Scraper tool
- Paint brush
- Drill
Instructions
- If you have cut your own wood slice start by drilling a hole into the top center of your wood slice and then cook your wood blanks in the oven at 220 degrees for an hour. If you have purchased your wood blanks you can skip this step.
- Using water and a cloth, wipe your wood slices down to clean them.
- Using Cricut design space. Upload the png or svg files and resize to fit your wood blank. When you are ready to cut your design click "make it" and choose your material.
- Place the black vinyl on the cutting mat pretty setup (which means backing side down on your cutting mat). You do not need to mirror adhesive vinyl.
- Cut and weed the design with the weeding tool. Weeding means to remove all the parts that you do not want to transfer to your Christmas ornament.
- Place a piece of standard grip transfer tape on top of your weeded design. Use the scraper tool to smooth the transfer tape on to the design.
- Remove the backing from the design you have already attached to transfer tape and carefully place on the wood slice. Make sure to center the design how you want it.
- When you have the design where you want it, press it down, smoothing from the center outwards to minimize any bubbles or wrinkles.
- Then use the scraper tool to adhere the design to the wood slice really well. This will make sure that the vinyl does not peel off later.
- Gently remove the transfer tape. It should come right off, but if you have any issues use the tip of your scraper tool to help you keep the vinyl in place as you go.
- Seal your wood Christmas ornament with a clear varnish by pouring a quarter size amount into the center of the ornament and using a paint brush to spread the varnish. Adding varnish is not necessary but highly recommended.
- Once dry add your string or twine to attach it to the Christmas tree and enjoy!
Notes
For more fun Christmas crafts visit DollarCrafter.com
Recommended Products
As an Amazon Associate and member of other affiliate programs, I earn from qualifying purchases.

Please Save This to Pinterest
Your shares are how this site grows, and I am sincerely grateful. Know a friend who’d like this? Please share it on Facebook or save it to your favorite homemade beauty board on Pinterest.