
Get your home ready for winter with this DIY dollar store snowman wreath! This festive wreath only takes about 30 minutes to make and it’s sure to bring a smile to everyone who sees it. Best of all, it won’t break the bank—which is always a plus around the holidays. So what are you waiting for? Let’s get started!
Find all our DIY Christmas Crafts and Ornaments here!
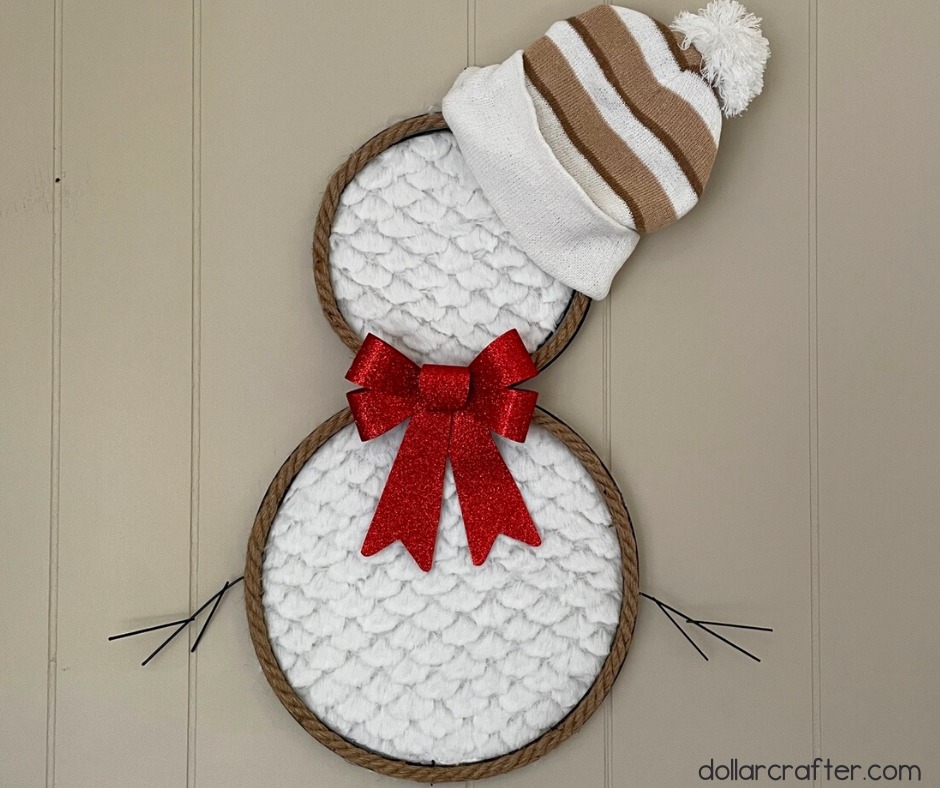
Snowman Wreath DIY
Supplies Needed:
- Snowman Wreath Form (Dollar Tree)
- Scissors
- Brown/Tan Striped Hat (Dollar Tree)
- Nautical Rope (Dollar Tree)
- Hot Glue gun
- White Faux Fur Pillow (Dollar Tree)
- Red Holiday Bow (Dollar Tree)
Tips for Making This Dollar Tree Snowman Wreath
If you know how to work a hot glue gun, then this wreath will be easy peasy for you!

Wiping your wire frame down with rubbing alcohol and allowing it time to dry prior to gluing on your snowman pieces (rope, faux fur fabric, and bow) may help your snowman wreath hold up better in extreme climates. This simple trick will help assure a clean bond.

Also, since we are using fabrics on this craft, it is highly suggested to stick to using low-temperature glue sticks so you don’t melt your materials.
How to Make a Dollar Tree Snowman at Home
Let’s get crafting! Below is our written tutorial.
Dollar Tree Snowman Wreath

Materials
- Snowman Wreath Form (Dollar Tree)
- White Faux Fur Pillow (Dollar Tree)
- Nautical Rope (Dollar Tree)
- Red Holiday Bow (Dollar Tree)
- Brown/Tan Winter Hat (Dollar Tree)
Tools
- Scissors
- Hot Glue Gun and Glue
Instructions
- Start by adding a line of hot glue and the nautical rope to the insides of the snowman wreath form. I started with the larger circle on the bottom.
- Complete this process until both circles outer rings are covered with the nautical rope. Cut the end with scissors and then add some hot glue to secure down. When adding the nautical rope to both circles make sure not to miss the bars that hold the form together. I made the ends meet in between both circles so that they could be hidden by the bow.
- Cut the faux fur pillow on 3 sides leaving one side attached. Cut a large enough section of faux pillow to cover the bottom circle.
- Using the hot glue gun attached the pillow to the backside of the snowman wreath form. You might need to stretch it across the center part to fit.
- Trim the edges of the pillow off. Repeat the same process for the top circle.
- Apply a dab of hot glue to the backside of the red bow and apply to where the two circles meet
- I just placed the winter hat over where the hat form part is but you can use some hot glue if you would like for it to be more secure.
- Hang up and enjoy!
Notes
For more fun winter crafts visit DollarCrafter.com
Please Save This to Pinterest
Your shares are how this site grows, and I am sincerely grateful. Know a friend who’d like this? Please share it on Facebook or save it to your favorite crafts board on Pinterest.
I love doing crafts