
Spring is here and what better way to welcome the season of renewal and growth than by adding some vibrant and colorful decor to your home? A beautiful wreath on your front door is a perfect way to add a touch of springtime charm to your entryway. And the best part is, you can create a stunning wreath using supplies from the Dollar Tree!

DIY Tulip Grapevine Wreath
I am for spring! It’s the perfect time of year to refresh your home decor and bring in some bright and colorful accents. And what better way to do that than with a beautiful wreath? Not only will it add a pop of color to your entryway, but it’s also a great way to welcome guests to your home.
All the materials used in this project are readily available at your local Dollar Tree store, making this wreath both affordable and accessible. So, let’s gather our supplies and get started!
Supplies:
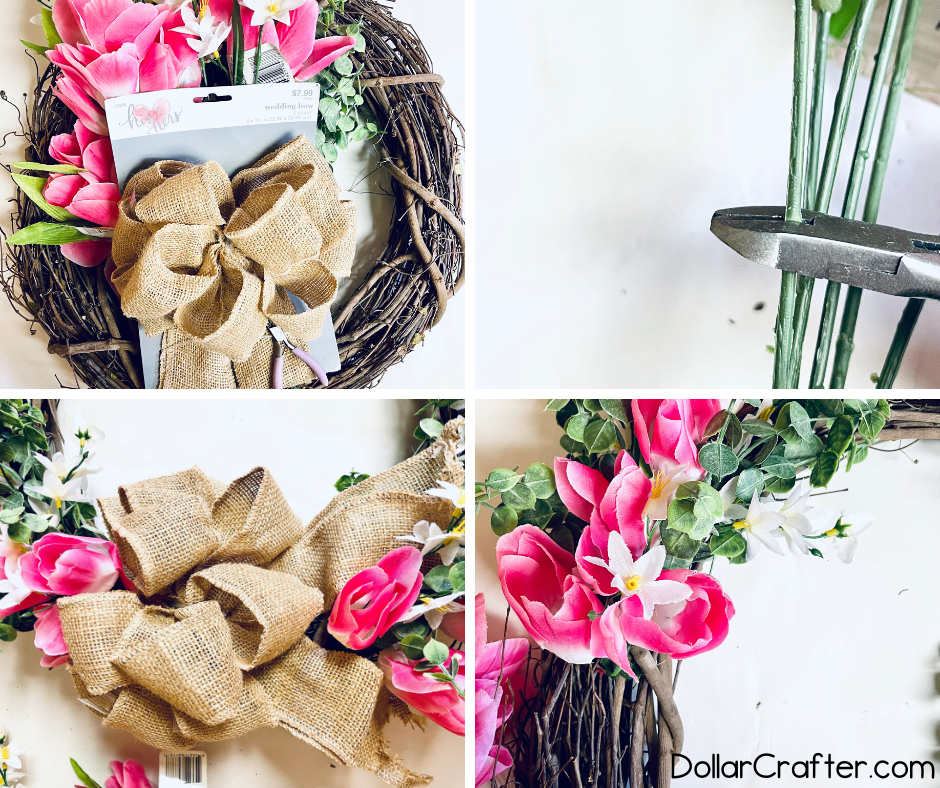
- 18 inch Grapevine Wreath
- Wire Cutters
- Premade Burlap Bow
- Faux Pink Tulips (2 bunches)
- faux Small White Flowers with a Yellow Center
- Faux Eucalyptus Bunch
- Hot Glue Gun and Glue, optional
Tips for Making a Tulip Grapevine Wreath
Before making this homemade wreath trim your flowers and eucalyptus stems to about 3 inches long using wire cutters. This will make it easier to weave them into the grapevine wreath. You can also use the wire cutters to cut any excess stems to keep your wreath looking neat and tidy.
To ensure that your wreath lasts longer, consider adding a dab of hot glue to each stem before inserting it into the grapevine. This will help to secure the flowers in place and prevent them from falling out.
As you add the flowers to the wreath, start with the top section and work your way down. Weave the stems in between the grapevine and mix up the colors and textures for a more natural look. Be sure to space out the flowers and greenery to keep the wreath looking balanced.
If you’re using a premade bow, tie it onto the wreath first and then add the flowers around it. This will make it easier to position the flowers and ensure that they don’t cover up the bow. If you’re making your own bow, try using a contrasting color to make it stand out.
Finally, don’t be afraid to experiment with different flower combinations and placement. The great thing about making your own wreath is that you can customize it to your liking and create a unique piece that reflects your personal style. So have fun and let your creativity flow!
How to Make a Tulip Grapevine Wreath
Ready to get crafting? You will find the full tutorial below!
Tulip Grapevine Wreath

Materials
- 18 inch Grapevine Wreath
- 2 Faux Pink Tulip Bunches
- 1 Faux Eucalyptus Bunch
- 1 Bunch Faux White Flowers with Yellow Centers
- Pre-made Burlap Bow
Tools
- Wire Cutters
- Hot Glue Gun and Glue, optional
Instructions
- Gather your supplies.
- Using wire cutters, trim the stems of all the flowers and eucalyptus bunch to about 3 inches long. This will make it easier to weave them into the grapevine wreath.
- (Optional) To make your wreath more secure and longer-lasting, consider adding a dab of hot glue to the end of each stem before inserting it into the grapevine.
- Starting with the top section of the wreath, begin weaving the pink tulips into the grapevine. Mix up the colors and textures by adding in the eucalyptus and white flowers with yellow centers.
- Once you have completed the top section of the wreath, add the pre-made burlap bow to the middle of the wreath. Tie it on securely.
- Finally, add more flowers to the bottom section of the wreath, underneath the bow. Try to space out the flowers and greenery evenly for a balanced look.
- Hang your finished wreath on your front door or anywhere in your home that needs a touch of springtime charm!
Notes
For more fun crafts visit DollarCrafter.com
Please Save This to Pinterest
Your shares are how this site grows and I am sincerely grateful. Know a friend who’d like this? Please share it on Facebook or save it to your favorite crafts board on Pinterest.