
Easter is fast approaching, and it’s time to add a twist to your egg dyeing tradition! If you’re looking for a fun, engaging, and colorful way to celebrate this holiday, you’re in for a treat.
Dyeing Easter eggs with whipped cream is a fun, easy alternative to conventional dyeing techniques. Imagine the vibrant, marbled designs you’ll create!
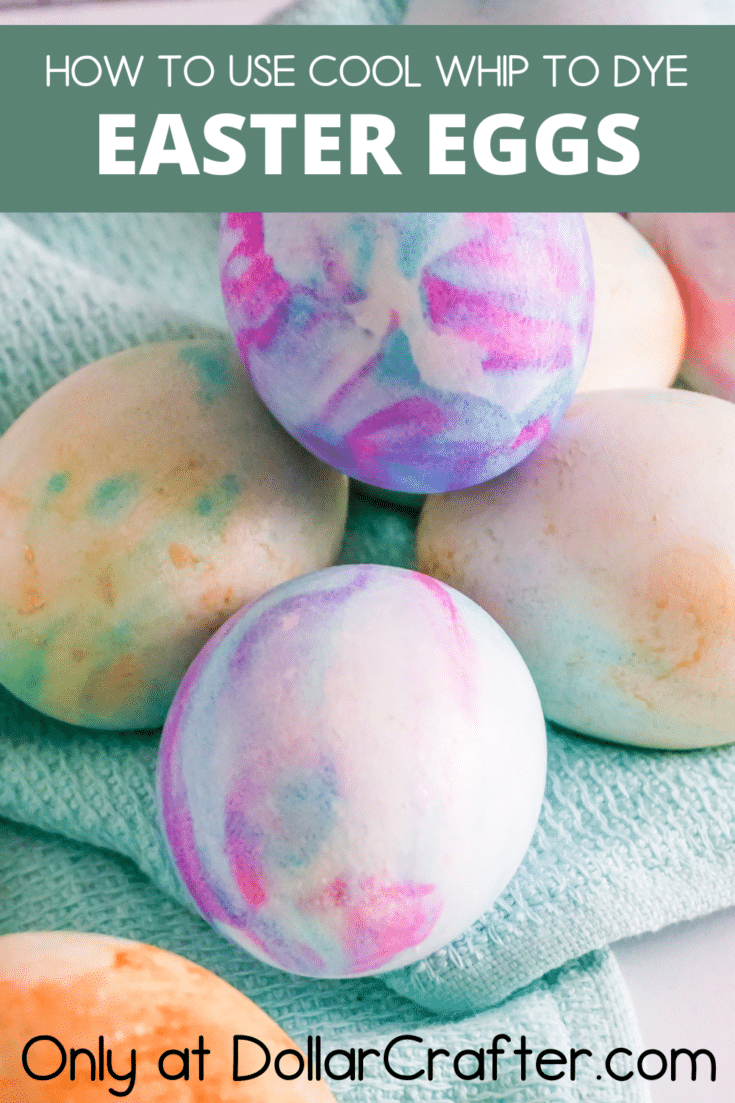
In this tutorial, we’ll show you how to transform ordinary eggs into stunning Easter masterpieces using nothing more than whipped cream (or Cool Whip) and food coloring.
This easy, mess-free approach is perfect for kids and adults alike, ensuring that everyone can join in the fun. So grab your aprons, gather your supplies, and get ready to embark on a whipped cream Easter egg adventure that you’ll remember for years to come!
Cool Whip Egg Dye Supplies
- Hard-boiled eggs
- Cool Whip or whipped cream
- Gel food coloring (or liquid food coloring)
- A shallow dish or tray
- Toothpicks or skewers
- Rubber gloves
- Paper towels
- A cooling rack or plate
If you’re looking for another fun way to decorate eggs, check out this unique egg decorating technique for some colorful inspiration!
Creative Design Ideas for Cool Whip Tie-Dye Eggs
It’s fun to experiment with various techniques to create unique Cool Whip tie-dye eggs:
Use multiple colors for a rainbow effect – but don’t overdo it or it’ll end up being a muddy brown color.
Create a two-tone or ombre effect by using two shades of the same color.
Make a galaxy-themed egg by combining dark blues, purples, and black, with a touch of white for stars. If you really want to hate your life, add glitter.
Try a monochromatic color scheme for an elegant and sophisticated look.
Tips for a Mess-Free Cool Whip Egg Dyeing Experience
To ensure a fun and stress-free Cool Whip egg dyeing session, follow these tips for easy clean-up and minimal mess:
- Use rubber gloves to keep your hands clean and dye-free: Wearing disposable rubber gloves will not only protect your hands from stains but also prevent any oils from your skin from affecting the dyeing process. Nitrile or latex gloves are perfect for this task and are widely available in various sizes.
- Lay down newspapers or plastic tablecloths to protect your work surface: Dyeing Easter eggs can be a messy process, and spills are bound to happen. To safeguard your countertops or tables, cover your work area with newspapers, plastic tablecloths, or even a large trash bag. This protective layer will catch any drips or spills, making cleanup a breeze. Plus, it’s a great way to repurpose old newspapers or tablecloths that you might have lying around.
- Use disposable trays or dishes for easy cleanup: When setting up your Cool Whip dyeing station, consider using disposable aluminum trays, plastic plates, or even wax paper to hold your Cool Whip and food coloring mixture. This not only simplifies the process of switching between colors but also makes cleanup much easier. Once you’ve finished dyeing your eggs, simply toss the trays or dishes in the trash, and you’re done!
- Keep a roll of paper towels handy: Paper towels are an essential tool for managing spills and maintaining a clean work area while dyeing Easter eggs. Keep a roll nearby for wiping up any accidental spills, drying your hands, or patting your dyed eggs dry after rinsing.
- Kick all kids out of your workspace: Just kidding, we know that’s impossible, but it’s really the only way to ensure anything is mess-free! 😉
By following these simple tips, you can enjoy the fun and creativity of Cool Whip egg dyeing without worrying about the mess.
Cleaning and Storing Your Eggs
After you’ve finished dyeing your eggs, store them in a covered container in the refrigerator. They should last up to a week.
Make sure to peel the eggs before eating, as the outer shell may have come into contact with non-food-safe materials during the dyeing process.
Tips for Cool Whip Dyed Eggs
Use room temperature eggs: For best results, use room temperature eggs when dyeing with Cool Whip. Cold eggs can cause the whipped cream to harden, making it more difficult to achieve a smooth, marbled effect.
Experiment with different tools for swirling: While toothpicks and skewers work well for creating marbled patterns, you can also try using other tools like forks, spoons, or even small paintbrushes to achieve different effects.
Try pre-dyeing your eggs: For a more vibrant base color, pre-dye your eggs using traditional methods before using the Cool Whip technique. The marbled patterns will stand out even more against the pre-dyed background.
Allow the dyed eggs to dry completely: After rinsing off the Cool Whip and patting the eggs dry with a paper towel, let them dry completely on a cooling rack or plate. This will help the colors set and prevent smudging.
Use a hairdryer to speed up drying: If you’re in a hurry, you can use a hairdryer on the lowest heat setting to speed up the drying process. Hold the hairdryer about 12 inches away from the eggs, and gently move it around to ensure even drying.
Seal the colors with a clear, food-safe spray: To protect your dyed eggs from smudging and enhance their shine, you can use a clear, food-safe spray sealant. This will give your eggs a glossy finish and help preserve their beautiful marbled patterns.
Get creative with presentation: Display your Cool Whip dyed eggs in a beautiful basket, egg cups, or even create a centerpiece using a tiered stand. Your stunning creations deserve to be showcased!
Can you Dye Eggs with Cool Whip?
Yes, you can dye eggs with Cool Whip! This method is a fun and easy way to create beautiful marbled designs on your Easter eggs.
How do You Tie-Dye Eggs with Cool Whip?
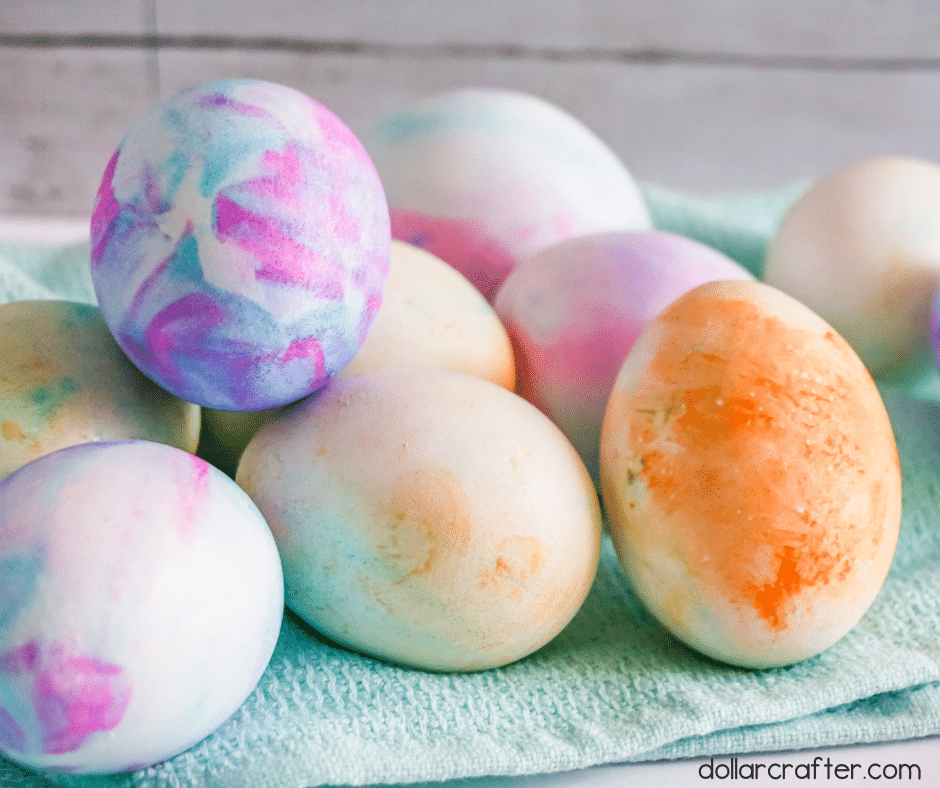
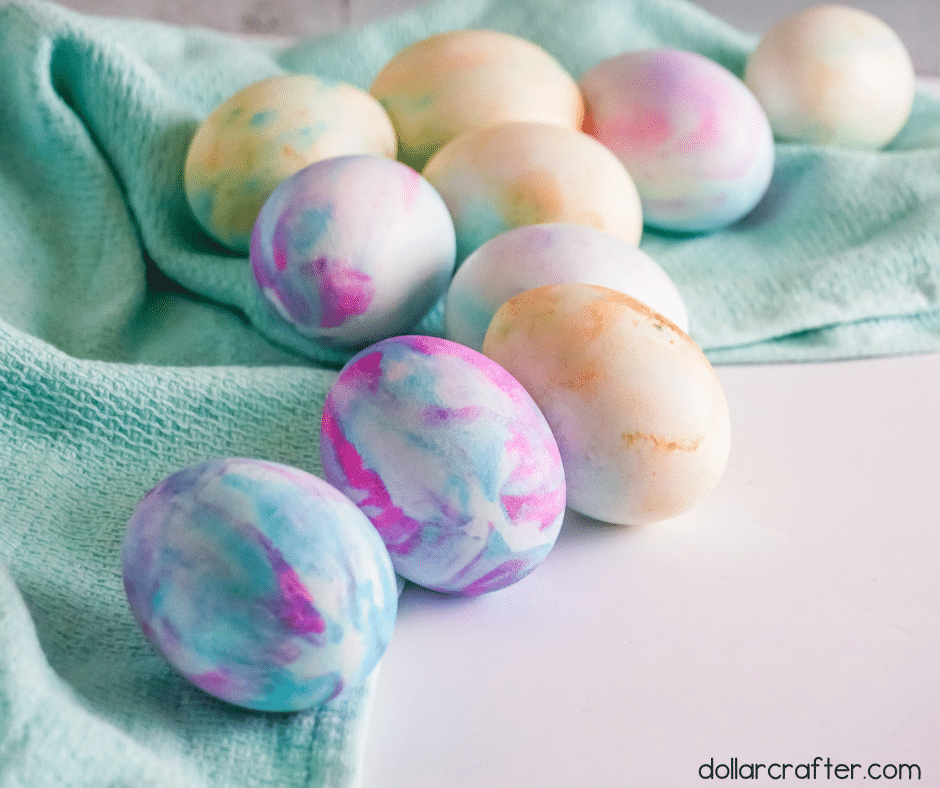
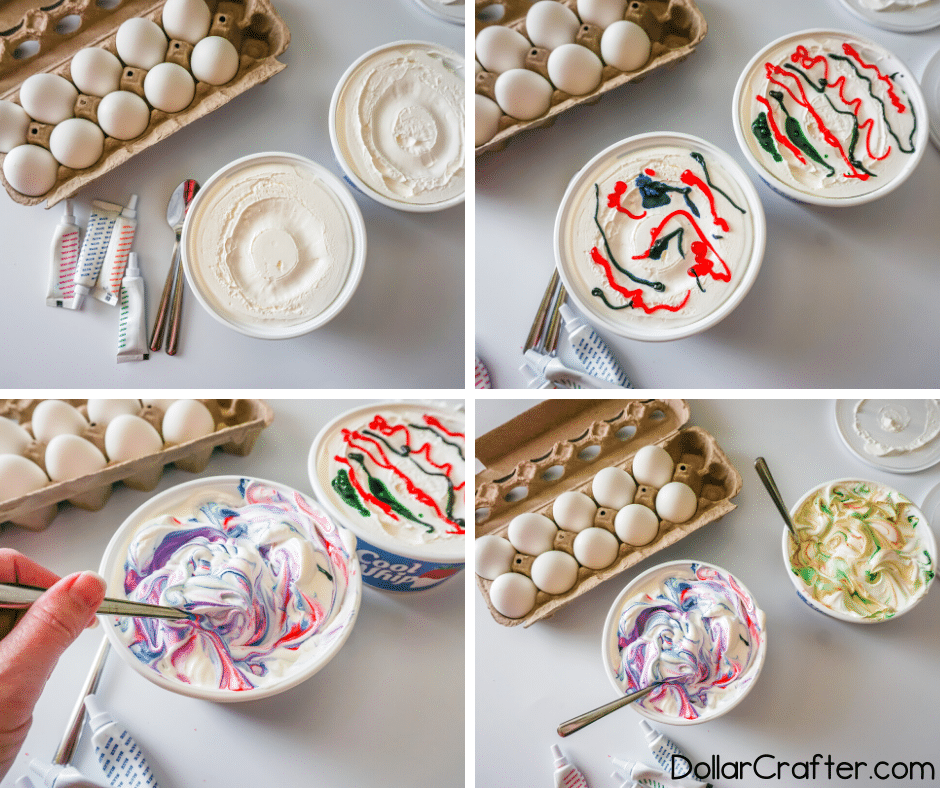
To tie-dye eggs with Cool Whip, you need to spread a layer of Cool Whip in a tray or shallow dish, add drops of food coloring, and then swirl the colors together using a toothpick or a skewer.
Next, roll your hard-boiled eggs in the colored Cool Whip and let them sit for a few minutes before rinsing them off to reveal the marbled pattern.
Do You Need to Use Gel Food Dyes?
While gel food dyes are recommended for their vibrant colors and consistency, you can also use liquid food dyes if that’s what you have on hand. The results may be slightly different, but you can still achieve beautiful marbled effects on your eggs.
Can I use Whipped Cream instead of Cool Whip?
Yes, you can use whipped cream as a substitute for Cool Whip. However, be aware that the results might differ in terms of color vibrancy and pattern definition, as whipped cream is not as stable as Cool Whip.
How Long do Cool Whip Dyed Easter Eggs Last?
Cool Whip dyed Easter eggs can last up to a week when stored in the refrigerator.
Make sure to keep them in a covered container to prevent odor absorption and maintain their freshness.
Is it Safe to Eat Eggs Dyed with Cool Whip?
Yes, it is safe to eat eggs dyed with Cool Whip as long as you use food-safe dyes and store the eggs properly (see above).
It is recommended to peel the eggs before eating, as the outer shell may have come in contact with non-food-safe materials during the dyeing process – no clue how we survived the 80s! 😉
How to Make Cool Whip Dyed Easter Eggs
Ready to get crafting? You will find the full tutorial below!
Cool Whip Tie-Dyed Easter Eggs
Embrace the magic of marbled designs with our Cool Whip Tie-Dyed Easter Eggs guide! Learn how to create gorgeous, swirled patterns on your Easter eggs using Cool Whip and food coloring. This fun, simple, and mess-free technique is perfect for a memorable and creative Easter egg dyeing experience.
Materials
- 12 Boiled Eggs, cooled completely
- 2 8oz Whipped Cream Containers
- 4 GEL Food Colors
Tools
- Spoons
- Paper Towels
Instructions
- Prepare your hard-boiled eggs and allow them to cool completely.
- Spread a layer of Cool Whip or whipped cream in a shallow dish or tray.
- Add drops of your chosen food coloring(s) to the Cool Whip. Be sure to space them out and use contrasting colors for a vibrant effect.
- Use a toothpick or skewer to swirl the food coloring into the Cool Whip, creating a marbled pattern.
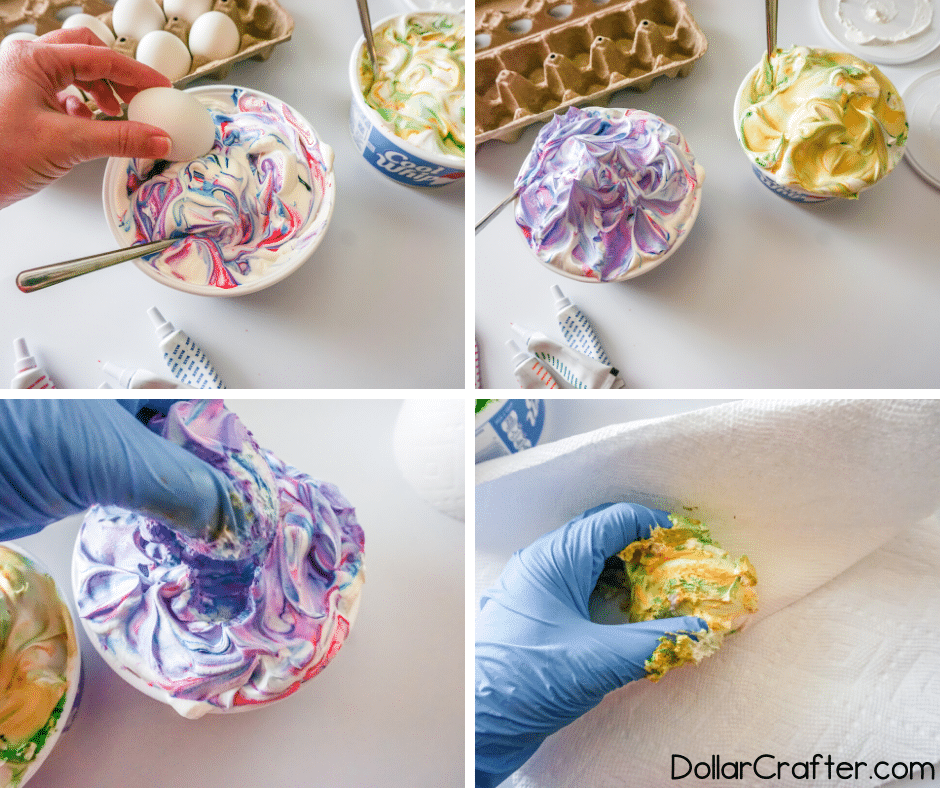
- Put on your rubber gloves and gently roll an egg in the colored Cool Whip, covering the entire surface.
- Place the coated egg on a cooling rack or plate and let it sit for about 10-15 minutes.
- After the waiting period, gently rinse the egg under cool water, rubbing off the Cool Whip to reveal the marbled pattern. Pat the egg dry with a paper towel.
- Repeat the process with the remaining eggs, using different color combinations and patterns for variety.
Notes
For more fun Easter crafts visit DollarCrafter.com
Please Save This to Pinterest
Your shares are how this site grows and I am sincerely grateful. Know a friend who’d like this? Please share it on Facebook or save it to your favorite crafts board on Pinterest.